Teaching at Susan's Spinning Retreat

Fabulous teaching photos by Ann Krieg!

Fabulous teaching photos by Ann Krieg!

I taught at Susan’s Fiber Shop retreat this past weekend. We cozied up in a hotel while the temps outside dipped below zero.

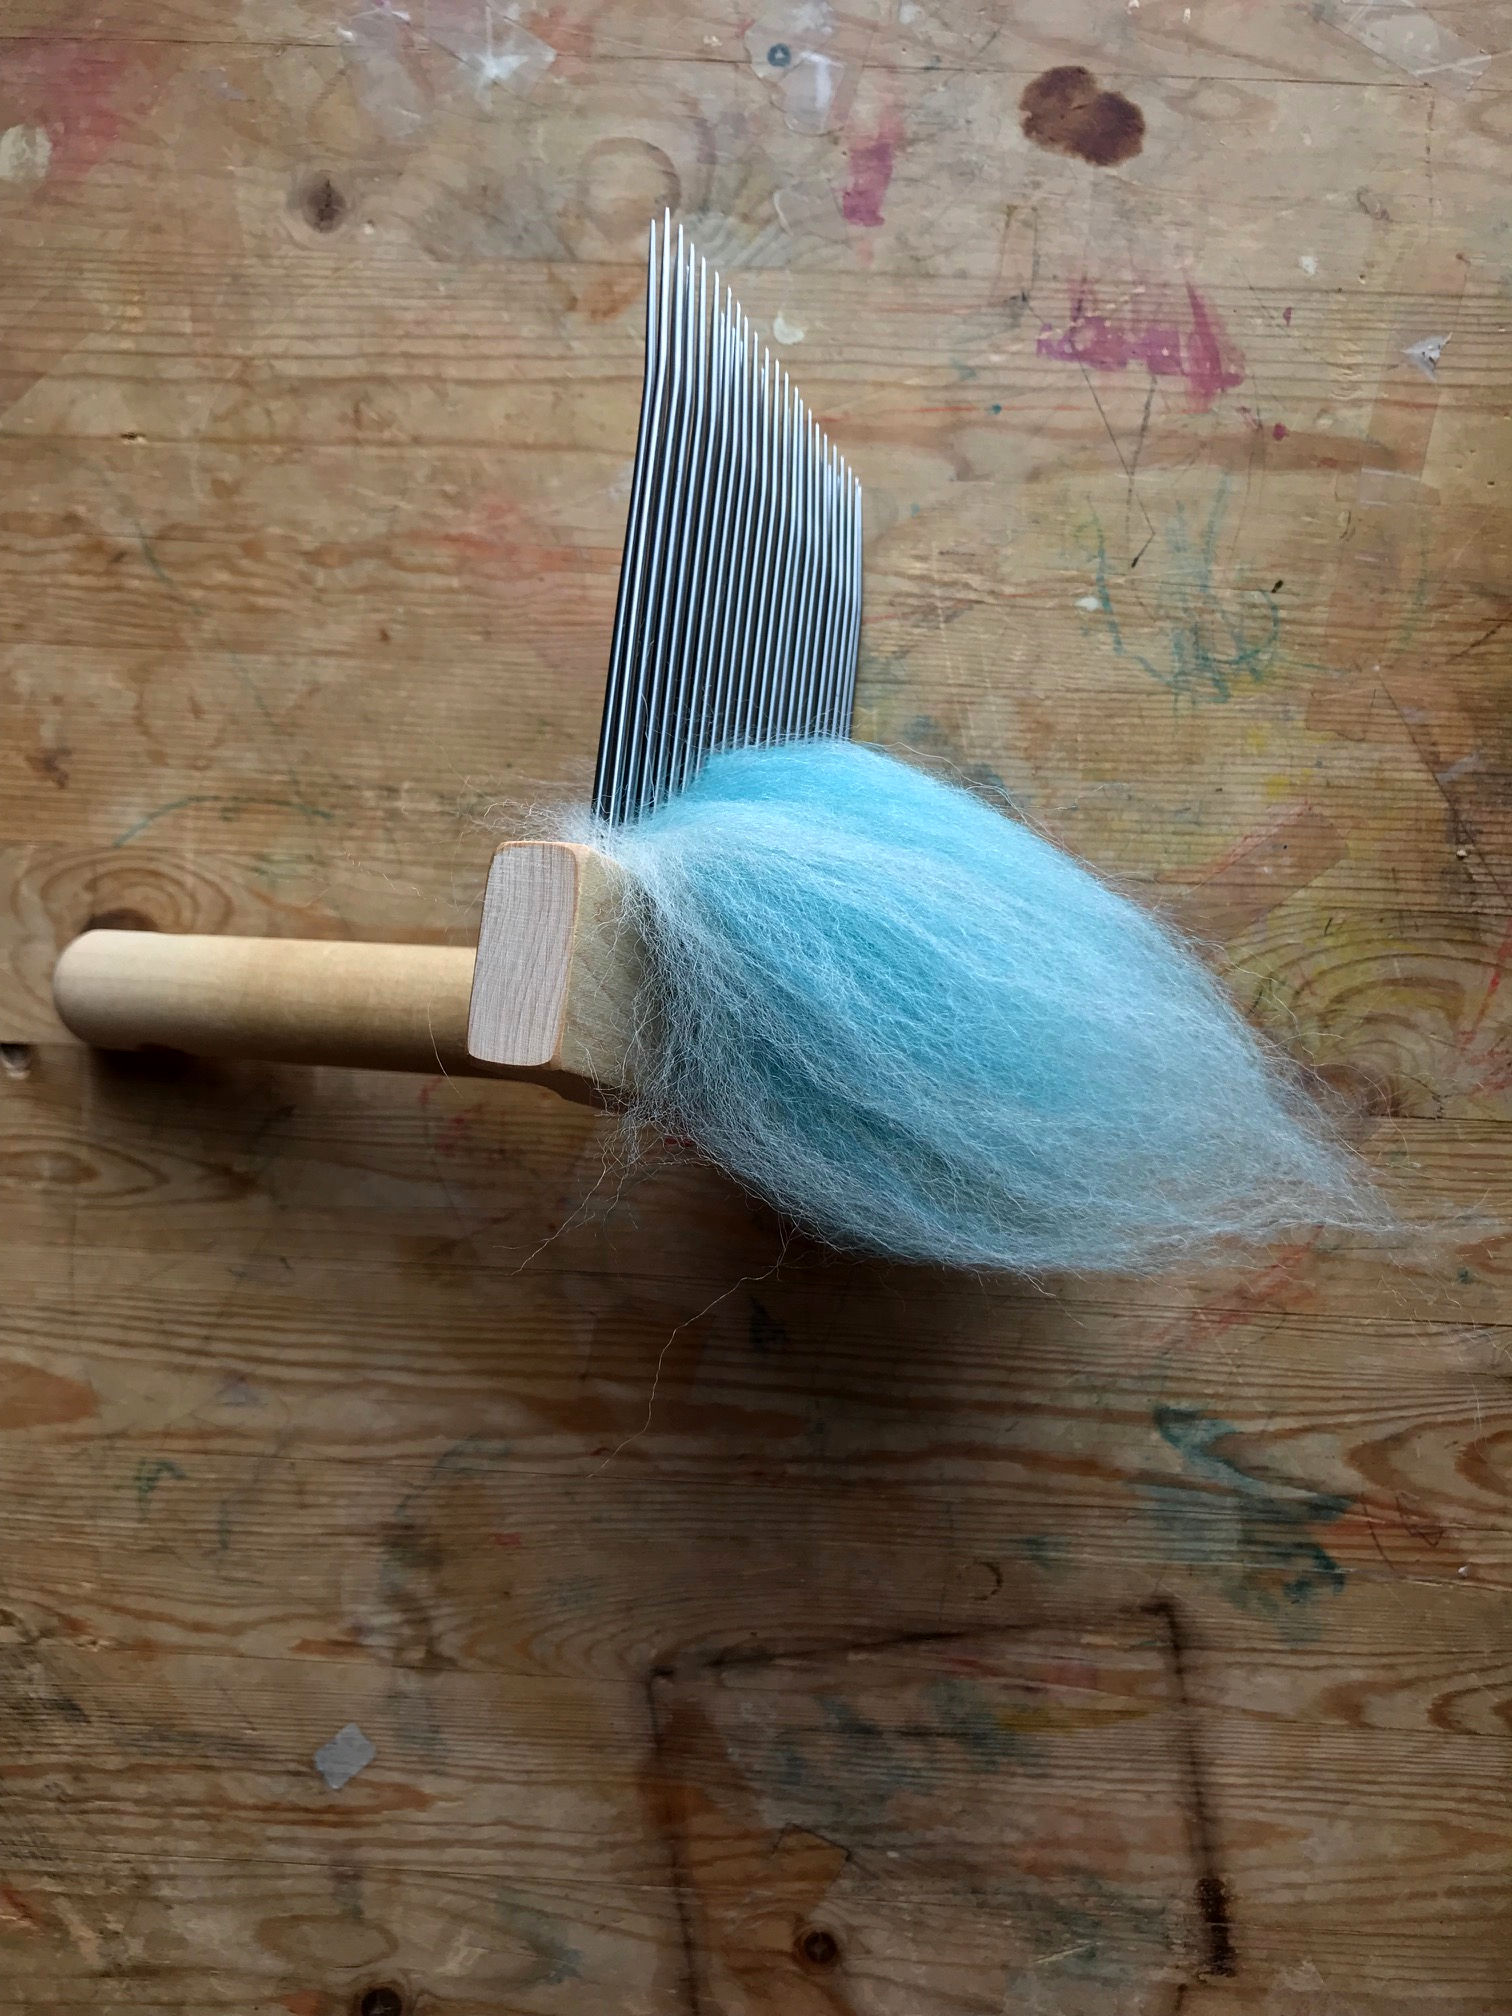
A whole bunch of spinners filled a ballroom and some of them gathered round while a did a blending board demo. A few more took classes with me for the next two days.

We had a great time, they were skilled spinners with a lot of questions. We covered our class material and a lot more.

susans shop collage.jpg


There was a field trip one afternoon to Susan’s Fiber Shop. Holy cow!

It’s giant and there is everything a fiber fanatic would want, knitting yarn, spinning fiber, beads, weaving yarn, and so many books.

The book section is biggest I’ve seen in a shop. She has new books and a lot of out of print books.

It was a great way to spend the afternoon!

pie.jpeg

Then there’s was pie.

The spinners of Wisconsin whisked me away to the Nordske Nook where I had a slice of lingonberry sour cream. It was divine.

An Article Worth Your Time

I am home after teaching in Iowa City (Hi Greg!) for 48 hours before I jump in the Stash Mobile™ and head to Susan’s Fiber Retreat outside of Madison.

I wanted to make sure every fiber person I know sees this article by Jaya Saxena on Vox.com.

It’s really the best overview that I have read of the discussions and work that has been going on on social media about racism in the fiber community.

It tells important truths about what has happened recently on social media and about the racism that has been going on in fiber shops, fiber shows, and magazines for far too long.

A Different Diz, Just in Case

blended fiber.jpeg

I think it’s ok to say I have color on the brain right now. I’ve been working on playing, practicing , and sampling color blending on combs and cards.

This particular day I had a blue that I wanted to lift to lighter with white.

layered waste.jpeg

I layered the fiber on my comb, just eyeballing it to about 50% blue, 50% white.

I layered the fiber to get the colors to blend quicker and more heathered. If I had put in on in stripes the colors would have been more flecked, unless I did more passes.

You know me, the shortest distance between fiber and sample is my sweet spot, unless I’m wandering the neighborhood like Billy in Family Circus. You can see the layers in my comb waste.

I didn’t want to spin from the combs, mostly because I’ve had a bout of insomnia (yay, menopause) and I’ve been tired-clumsy. I know I would poke myself somehow while spinning. So I decided to make top by pulling the fiber slowly through a diz.

I turned my spinning corner(s) over and couldn’t find my diz. I usually use purpose-made diz or a vintage button with big holes to diz. I couldn’t find either.*

I looked in our house toolbag and all of the washers I found were rusty or grimy. A washers makes a great diz too.

needle gauge as dizz close.jpeg

What else did I have that has holes in it? What did I just buy to put in my knitting tool kit (because it was so cute) that every knitter uses and has at least one in their project bag? A needle gauge!

This one is from my local, Spun, and is made by Katrinkles. Any needle gauge will work, just make sure it’s smooth inside those holes.

I chose a 5.5 mm needle size to diz through and it worked perfectly. I even liked having a bigger surface to hold on to as I pulled my fiber through. Now I’m torn where to put my new needle gauge, in my spinning kit or my knitting kit.

*the mystery of the missing diz and button was solved when I put my combs away in the their storage bag. Yup, both were sitting at the bottom of the bag. I swear I looked there.

On My Mark, Get Set, Write!

It always starts with office supplies…….

It always starts with office supplies…….

I’ve talked about it a little bit here and when I’m teaching, but the time has come to stop talking and start writing.

I’m writing another book. It’s about spinning color, my favorite. It will expand on the parts about color in Yarnitecture, and the work we do in my Colorplay class.

It will be 100% about working with commercially prepared fibers and absolutely no dyeing. If there is something you particularly want me to cover, let me know.

I’ve made an outline, a giant chart on a presentation board (like for science fair), and have a giant 3” binder. It’s all about the office supplies, once I set those up I know there’s no turning back.

I’m excited and super nervous. It’s time to pour a whole lot of words, and some heart and soul onto paper.

Emergency Orifice Hooks

replacement hooks.jpg

If my wheel doesn’t have a spot to store an orifice hook, I’m sunk. I constantly misplace orifice hooks, even sometimes when they have a spot on my wheel. I don’t know what it is, I’ve found several in the wash and in between couch cushions.

After spending too much time trying to thread my leader through an orifice without a hook, I figured out a way to make a couple different quick emergency hooks.

I always keep two things in my spinning kit to use as emergency hooks, paper clips and dental floss.

The paper clip hook is quick, but sometimes it can be fiddly, if you have a long orifice. I usually use a small clip because they are the most bendy, which helps getting it into and out of the orifice.

I open the clip all the way and make a small hook at one end. I make the hook with little pliers I have in my spinning kit, by pressing the end against a hard surface (like a table), or sometimes just with my hand.

Dental floss is quick too, and easy to carry around in it’s handy little box. I use my grocery store brand, and make sure that it’s waxed or coated in some way. The coating gives it just enough stiffness to not collapse while I’m threading.

I break off about 12”, fold it in half, and tie it together at the open end. This makes a loop style orifice hook that’s good for especially a long or a sharply curved orifice.

A bonus to having dental floss on hand, it can be used to tie skeins, or as emergency stitch markers.

There aren’t pretty, but they get the job done in a pinch!

3 Reasons I Use a Yarn Ball Holder for Knitting

akerworks2.jpeg

I’ll admit I’m late to join the admiration society of yarn ball holders.

I used to think a yarn holder was one in a long list of knitting tools that I just didn’t want or need, but after using it for a couple of months I don’t want to knit without one.

A bonus as a spinner, a lot of yarn ball holders can double as a single-bobbin Lazy Kate.

For me, it comes down to three knitting benefits that make it my newest knitting friend.

Smooth yarn. If I'm knitting from a commercial skein, a yarn cake, or a hand wound ball, I always pull my yarn from the outside. Pulling from the inside of a skein, cake or ball adds twist I don’t want in my yarn. A yarn ball holder holds yarn on a spike sitting on a base that turns, so it’s easy to spool yarn off of the outside with no added twist.

Supported yarn. A yarn cake that’s on a yarn ball holder is supported. The shaft holds the cake so it won’t collapse on itself as the cake gets smaller or if the yarn is slippery. The turntable that it sits on spools the yarn off with no tugging, I knit and there is a constant stream of yarn. To me that means the yarn isn’t being stretched as I knit.

Cleaner yarn. My yarn stays where I put it like a baby in a bouncy seat. No more leaping and hopping balls of yarn that get chased by cats and dogs and end up tangled around the leg of the couch covered in grit and fuzz. I knit at movies a lot and using a yarn ball holder means no more accidentally sticky yarn from dropping on the floor.

I’m already thinking about buying another holder, and the two things that it has to have for me are the rotating base (some are a static spike), and it has to pack flat for traveling.

The yarn ball holder (pictured above) that pushed me into knitting bliss is the Flat Pack Yarn Caddy and Butterfly Kate Kit from Akerworks that I was sent to review for the latest Knitty.

New to Me Fiber: Nest Fiber Studio

Nest Chasing Deer fiber.jpeg

I first noticed Nest Fiber Studio’s fibers on Laura Linneman’s Instagram feed. I know Laura has great taste in fiber, so I bought myself some BFL try.

Here’s what I bought:

I split the braid in two lengthwise and spun it as a low-twist singles on my Schacht Matchless, using my WooLee Winder.

Nest Chasing Deer color pattern.jpeg

The fiber was soft, with less sheen and a shorter staple than some BFL I’ve spun lately. It was treated so well and gently in the dying process that it wasn’t compacted at all. I shook it and spun, I didn’t even have to unroll the edges of the fiber.

Spinning BFL woolen is my happy place. Because BFL has a longer staple than many wools, it’s easy and relaxing to spin it with a lower twist.

I have to mention again how nice and lofty the fiber was, I didn’t run into one area where it was stuck together. I find fiber this well prepared and handled rarely.

Nest Chasing Deer yarn skein.jpeg

The colors are wonderfully moody, and she has really utilized the darker stripes in the mixed BFL. She incorporates it into the colorway instead of just using them to darken the colors, you can see it particularly in the gold and green.

The fiber is dyed in a regular pattern with short to medium color lengths. The colors range from solid to semi solids in spots. This creates depth to the yarn, places where it is deeply a color and places where the original fiber color almost peeks through. I had no dye leakage when I finished my yarn.

Nest Chasing Deer swatch.jpg

I knit a quick swatch, and steamed it on the needles. I’m not sure if I want to knit with this yarn or weave with it.

The knitted fabric is lush, the BFL is silky and has great drape (which makes me want to weave with it), and I really like the visual play of the semi solid places in the color. It’s rich and textural, something that’s impossible to get when a yarn is dyed after it’s spun.


BIPOC Fiber Dyers

Sheepspot Cheviot in the color Mexico. Photo by Sheepspot

Sheepspot Cheviot in the color Mexico. Photo by Sheepspot

I am a white-passing Latina and my way in the fiber industry has been easy do to my privilege. I have not supported or promoted BIPOC fiber dyers and growers as I should have, and for that I am sorry.

I am listening, studying, and thinking a lot about what has been said over the past week.

Today I am starting a list of BIPOC fiber dyers that I will maintain here on my blog for spinners.

The list will include a link to each dyer's shop and a list of what they dye. More information on the dyer and the fibers will happen in upcoming reviews of their fiber.

BIPOC Fiber Dyers - Updated 7/17/20

I will add to this list of fiber dyers regularly. If you’d like to share your favorites, just comment below.